You may have heard of “decking.” This describes when a climber falls and hits the ground or large surface like a ledge. No climber wants to deck. In fact, this is probably the number one fear of climbing.
But, why do some route setters place bolts so far apart on a climb such that, if a fall occurs before the next clip, the result is body-meets-ground?
There are multiple reasons this occurs:
The frequency with which I have encountered deck-potential bolted climbs has been enough that I always visually inspect the location of bolts. Generally, I look at the placement of the first, second, and third bolts (details are provided below regarding what to look for). The risk of decking is not limited to the second and third bolts, but it is often difficult to see and judge bolt placement higher in the climb. I often find that if a route is well protected close to the ground, it is also going to be well protected higher up. Remember, whenever there is a large ledge, the same bolting rules apply as from the ground.
++ Remember, a lead fall will be AT LEAST twice the distance of the last clip. That means that if you are 5 feet above your last piece of protection, you will fall a minimum of 10 feet. I emphasize minimum because rope stretch, slack from the belayer, belayer movement towards the wall, and the amount of rope you have pulled out getting ready for the clip, will all add distance to the fall.++
Here is how to inspect bolt placement:
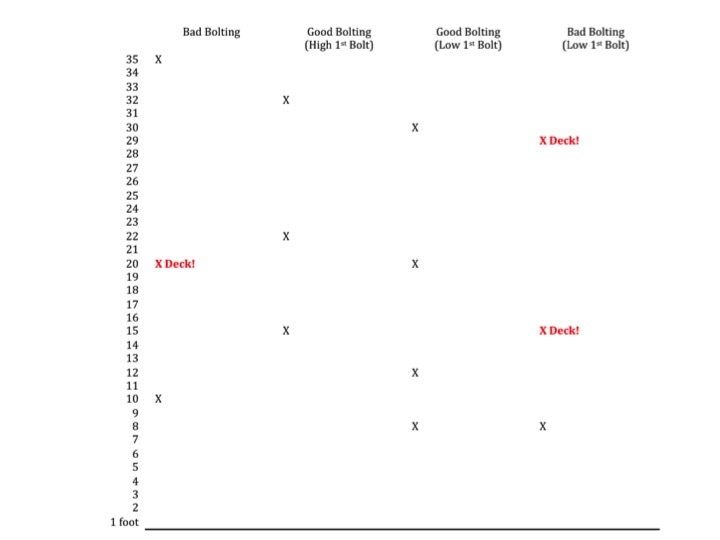
FIGURE 1 - Bolt Placement and Ground-Fall Potential *
*NOTE: This illustration assumes no additional slack in the system (e.g. no rope stretch, no pull rope to clip, etc.)
But, why do some route setters place bolts so far apart on a climb such that, if a fall occurs before the next clip, the result is body-meets-ground?
There are multiple reasons this occurs:
- Lack of awareness on the bolter’s part - Rather than thinking about placing bolts that protect the climber from ground-fall, the route setter may be placing bolts based upon other factors, such as where the rock allows for a good stance or for protecting the crux. Sometimes the reason may be more arbitrary, like “it feels right” or "seems good."
- It’s the “tradition” for the area – Each climbing area has its own route-setting “rules” often based in historical precedence. More recently developed climbing areas (from ~ 1990s to present) are generally amenable to more bolts. Climbing areas developed prior to the 1990s tend to encourage the “fewer bolts the better” approach.
- Purposeful run-out – Some route setters purposefully run-out a climb. Common rationales include to not deface the rock or to maintain the “purity” of the climb. (I personally agree with this IF a climb is protectable using trad gear.) Other route setters believe that easier sections of a climb do not need as much protection. The problem with that reasoning is "easy is relative" - what is easy for one may not be for another. A 5.8 may be super cruiser for a 5.12 climber, but difficult for a brand new lead climber. Routes should be bolted to protect everyone. In addition, due to a variety of reasons, falling can occur at any time. Easy does not equal safe.
The frequency with which I have encountered deck-potential bolted climbs has been enough that I always visually inspect the location of bolts. Generally, I look at the placement of the first, second, and third bolts (details are provided below regarding what to look for). The risk of decking is not limited to the second and third bolts, but it is often difficult to see and judge bolt placement higher in the climb. I often find that if a route is well protected close to the ground, it is also going to be well protected higher up. Remember, whenever there is a large ledge, the same bolting rules apply as from the ground.
++ Remember, a lead fall will be AT LEAST twice the distance of the last clip. That means that if you are 5 feet above your last piece of protection, you will fall a minimum of 10 feet. I emphasize minimum because rope stretch, slack from the belayer, belayer movement towards the wall, and the amount of rope you have pulled out getting ready for the clip, will all add distance to the fall.++
Here is how to inspect bolt placement:
- Look at the distance of the first bolt from the ground, then look at the distance of the second bolt from the first bolt. The distance between bolts 1 and 2 must be less than the distance between the ground and bolt 1. In general half the distance is good. (Fig. 1 – red X indicates bolt placement that would result in ground-fall)
- Look at the distance between bolt 2 and 3. It should not exceed the distance between the ground and bolt 1.
FIGURE 1 - Bolt Placement and Ground-Fall Potential *
*NOTE: This illustration assumes no additional slack in the system (e.g. no rope stretch, no pull rope to clip, etc.)
Things to keep in mind:
- The first bolt dictates the distance between subsequent bolts up to approximately the 3rd - 4th bolt.
- Low first bolts require more bolts in a shorter distance (in the example above it requires 4 bolts in 30 feet). Low first bolts are not necessarily better. With a low first bolt, if the subsequent bolts are not spaced just right, there is actually a greater risk of ground-fall from a higher distance compared to a high first bolt! (See the far right scenario in Figure 1). Low first bolts can give a false sense of security. (I used to love low first bolts until I did this exercise. Now I take extra care to visually inspect bolt placement on these.)
- High first bolts require fewer bolts (in the example above it requires 3 bolts in 32 feet). High first bolts can also generally decrease the risk of decking (i.e. there is a little more leeway for the route setter in bolt placement). The primary disadvantage of a high first bolt is an increased risk of injury from a fall before the first clip. This is why stick clips are great!
- Slab climbs are often some of the worst for run-out bolting. Due to their lower angle, slab climbs can also be difficult to judge distances. What can look like a short distance on a slab climb is actually a run-out rope-stretcher.